Tuesday, September 12, 2006

FC5 and jre

Was trying to get my java runtime environment working in FC5, thanks to this excellent guide, I managed to get it up really fast. http://www.mjmwired.net/resources/mjm-fedora-fc5.html#java

They have more resources than just on jre, so take a look at it. But in case they remove it anytime in the near future, I am pasting the guide to setting up jre:

1 March 2006

NOTE: Fedora Core 5 advises AGAINST using the Sun Java RPM.
Information can be found in the FC5 Release Notes on Java since the RPM may be
overwritten by a 'yum update' due to similar package names.

However if you do NOT use the FC5 Java packages, this should not affect you.

URL: http://java.sun.com/j2se/1.5.0/download.jsp

Choose the LATEST JRE Update, currently 6:

JRE 5.0 Update 6 includes the JVM technology
The J2SE Runtime Environment (JRE) allows end-users
to run Java applications. More info...
Download JRE 5.0 Update 6

Make sure to (*) Accept License Agreement

Choose:

Linux Platform
Linux self-extracting file (jre-1_5_0_06-linux-i586.bin, 15.99 MB)

Run:
[root@charon fc5]# sh ./jre-1_5_0_06-linux-i586.bin
(type 'yes')
[root@charon fc5]# mv -f jre1.5* /opt/jre1.5
[root@charon fc5]# ln -s /opt/jre1.5/plugin/i386/ns7/libjavaplugin_oji.so /usr/lib/mozilla/plugins/libjavaplugin_oji.so


(If you update the JRE package, simply delete the /opt/jre1.5 directory and
copy the update to /opt/jre1.5 -- there will be no need to update the 'ln' link.)

---

Controlling Java through 'alternatives'. When running the 'java' command,
FC5 will automatically pick the GNU Java, to use Sun's java do the following:

[root@charon fc5]# /usr/sbin/alternatives --install /usr/bin/java java /opt/jre1.5/bin/java 2
[root@charon fc5]# echo 2 | alternatives --config java

[root@charon fc5]# java -version
java version "1.5.0_06"
Java(TM) 2 Runtime Environment, Standard Edition (build 1.5.0_06-b05)
Java HotSpot(TM) Client VM (build 1.5.0_06-b05, mixed mode, sharing)

NOTE for SELinux User

Users running SELinux may NOT be able to get their browser to detect
the plugins. Make the following changes to the SELinux policy:

Run: system-config-securitylevel
Goto: SELinux > Modify SELinux Policy > Compatibility >
Allow the use of shared libraries with Text Relocation
Allow executables to run with executable stack

Sunday, September 03, 2006

FC 5 - Fedora Core wireless network setup with a windows driver

alright, I finally changed my windows to an FC5. And therein lies the problem, my stupid wireless driver is only for windows. Nevermind that, there are solutions right? And yup, I found ndiswrapper. Seriously, bless the fella who created that tool as it must have saved many a wireless network card. Anyway, so I proceeded to install it, but there were lots of tweaking to do. So this is what I have done, hopefully it helps some other poor soul.

1. Login as root, and type this command
# su -
(Frankly speaking, I don't know why I had to do this, but if I didn't, ifconfig and such commands won't work.)

2. Ensure that you have the kernel-devel RPM suitable for your kernel. You can check this by using this command
# cd /usr/src/kernels (If you do not have any, most likely you wouldn't even have the kernels folder.)

Assuming that you do not have it installed..(if you do, skip to...step 8)
3. Check your kernel version
# uname -rm

4. Proceed to look for the correct kernel-devel RPM
Note: The default stack size in the original FC5 kernel is only 4K, but most other external drivers like in my case, the wireless drivers, they require more, so you should update your original kernel as well.
Try this website
(http://www.linuxant.com/drivers/hsf/full/downloads-fc5-kernel-i686.php?PHPSESSID=b1775eea161ff873e65c90702b698052)

5. When you have downloaded the correct RPMS, you can create a folder to hold them and cd into it
# rpm -ivh *.rpm

6. Once installed, you have to edit grub to let it know which kernel to boot up as the original kernel is still there.
# cd /boot/grub/
# vi grub.conf
.....
title Fedora Core (2.6.15-1.2054_FC5.stk16smp)
root (hd0,0)
kernel /vmlinuz-2.6.15-1.2054_FC5.stk16smp ro root=/dev/VolGroup00/LogVol00 rhgb quiet
initrd /initrd-2.6.15-1.2054_FC5.stk16smp.img
#title Fedora Core (2.6.16-1.2129_FC5)
# root (hd0,0)
# kernel /vmlinuz-2.6.16-1.2129_FC5 ro root=/dev/VolGroup00/LogVol00 rhgb quiet

As you can see, I've commented out the original grub configs, so that grub will ignore them and boot the correct kernel.

7. Now reboot your system, once it starts, open your terminal window and repeat step 1. Then type this to check that the correct kernel is loaded:
# uname -rm

8. Get your Windows wireless network card drivers.

9. Install unshield(http://synce.sourceforge.net/synce/unshield.php)
# ./configure
# make
# make install

10. cd to where you downloaded the windows driver and use unshield to extract your cab files from your driver
#mkdir tmp
# unshield -d tmp x data1.cab

11. Ensure that you have no previous installations of ndiswrapper
# make uninstall
# make distclean

12. Download and install the latest ndiswrapper
# make
# make install

13. cd to the tmp folder we created earlier in the windows driver directory and look for an INF file.
# ndiswrapper -i .inf
# ndiswrapper -l (To check if the driver is there)

14. Edit the modprobe.conf file
# vi /etc/modprobe.conf
Add "alias wlan0 ndiswrapper" to the top of the file and make sure there is an extra line at the bottom of the file. Save and close.

15. Load the ndiswrapper.
# modprobe ndiswrapper

16. To check if ndiswrapper has been loaded, do this:
# dmesg

17. Now, to configure your network card. Go to System > Administration > Network

18. Click New and select wireless as your device type.

19. After clicking "Forward", you should see ndiswrapper as one of the wireless card to configure. Select it and the rest of the configurations will depend on your own wireless network.

Monday, August 21, 2006

Cool websites

Just discovered this websites and pasting the links here first so I don't forget shall check it out later..

http://www.openwall.com/
http://www.unixgeeks.org/
http://www.spidynamics.com/spilabs/js-port-scan/

Saturday, August 12, 2006

$@%

I have no idea why I enjoy coding in funny symbols. But anyway, here's a link to the source of the that started it all! It has a couple of translations, so if you need it or want to add to it, check this out.

Mastering Regular Expressions

As its author says, "it's not just for perl" programmers, but in my opinion, it's best in done in perl hehehehe :p

Wednesday, June 14, 2006

mambowiki on Joomla anonymous access problem

So I have been working on this website, and it is running Joomla on it. So I installed mambowiki as well as I thought it'd be cool to have a wiki there with tutorials and stuff on it where people can read and edit, etc. But there was a problem with the access controls in mambowiki. I wanted to allow anonymous users to be able to view the stuff on the wiki as well, but trying to set that configurations through the admin page is useless. Googling around did not help much either, I am not sure if I am an isolated incident hmm.

I tried a fix that I found from somewhere, it said to either remove or add this line: $wgDisableCookieCheck = true;

But this did not seem to have any effect on my system. Then I decided to look through some of the codes to figure out how it worked, and maybe I will get lucky, and I did. So here is my fix, hopefully it works for anyone who might encounter similar problems.

1. Go to your components/com_mambowiki folder and open mambowiki.php

2. Scroll down the code and look for this line:
$AllowAnonymousAccess = $params->get('allowanonymoususers', 1);
// Default = no (as in Yes=0, No=1)


3. Change the '1' to '0'.
$AllowAnonymousAccess = $params->get('allowanonymoususers', 0);
// Default = no (as in Yes=0, No=1)

That's it, anonymous users should be able to view your website now, whether they can edit or not will be set in your admin configs.

Tuesday, May 30, 2006

Fedora Core 5 - Pirut (Software Package Manager)

Well today I was preparing some materials for a workshop tomorrow. And I was googling around to find out how to use Fedora Core 5's gui Package Manager. The unfortunate thing was that we were unable to connect the laptops we prepared to the school's network. Meaning, NO INTERNET ACCESS! So fine, we thought we can just install packages from the discs.

But therein lies Fedora Core 5's quirk. It's software package manager, aka 'pirut' only retrieves software through online repositories! So whenever I tried to use the gui package manager, it just threw me some error which did not even tell me the problem. So googling around, thanks to several forums, I found out that the problem was this strange characteristic of pirut. So how to fix this? Googled again, but only one blog talked about getting it fixed, but did not exactly state how. There was also another website that gave quite detailed steps, but again, it was apparently not tested yet. So fine, I had to just mess around, with only a few hours to go. In the end, this is what I came up with. I hope it helps anyone else who has this problem.

1. Create a directory to hold the rpms.(I put mine in /tmp)
# mkdir -p /tmp/RPMS

2. Change directory to the repository folder
# cd /tmp/RPMS

3. Create directories to temporarily mount the discs
# mkdir disc1 disc2 disc3 disc4 disc5

4. Insert disc 1 and mount it
# mount -r -o loop /dev/hdb disc1

5. Copy the RPMS from the mounted directory(disc1) to our current directory
# cp disc1/Fedora/RPMS/* .

6. Copy comps.xml as well
# cp disc1/repodata/comps.xml .

ok, here you gotta wait a while

Basically you do steps 4 and 5 again until all the 5 discs are done if you wish to install packages from all 5 discs.

7. Once you are done, unmount and remove the files.
# umount disc1 disc2 disc3 disc4 disc5
# rmdir disc1 disc2 disc3 disc4 disc5

8. Now to create the repository metadata
# rpm -Uvh createrepo*
# createrepo -g comps.xml .

9. Edit yum.conf
#vi /etc/yum.conf

10. Add in the below lines and save your changes. (NOTE: You can actually add it in the yum.repos.d as well if you wish)
[testing]
name=testing the repos
baseurl=file:///tmp/RPMS
gpgcheck=0

11. Now you have to disable the repositories that point to an online source for the package manager to run properly.
# cd /etc/yum.repos.d
# ls
(You should see something like the below. Those are the default repository files)

12. To disable the repositories, set enabled=0 in the .repo files
# vi fedora-core.repo

13. Do the same for the rest of the .repo files

14. On your desktop, try the Add/Remove Software package manager again.

It should work now.

The above could not have been done without some reference from http://www.city-fan.org/tips/YumRepoFromImages
They also have an excellent tutorial for copying iso from DVDs

Monday, May 22, 2006

Obsfucated nick

Okay, here's an attempt at obsfucating my nick :p Tried to post it on perl monks, but still not sure what was going on, the post apparently is stored in there, but not published?? Oh well, anyway here's my code, meant to run in commandline :D

perl -e "$c=1;foreach $l(a..z){if($c==13||$c==1||$c==9||$c==5){push(@m,$l);}elsif($c==7){push(@m, $l);push(@m,$l);}$c++;}($b,$f,$h,$h,$j,$n )=(shift(@m),shift(@m),shift(@m),shift(@m),shift(@m),shift(@m));@m=();
push(@m,$n,$b,$h,$h,$j,$f);print @m;"

Sunday, May 21, 2006

Open Office Deployments

http://wiki.services.openoffice.org/wiki/Major_OpenOffice.org_Deployments

The above link tracks public information on major Open Office deployments! This is cool, if every instituition who actually deployed it add to this site, then we can see how far Open Office has spread! And, I am glad to see Singapore's Ministry of Defence in the list!

Thursday, May 18, 2006

Java classpath settings

A funny thing in class today. Well the students were supposed to run some java code with the good old command prompt for the first time, but some had problems running the 'java' and 'javac' commands. Of course they could just do something like:

C:\java_stuffs> javac -cp . MyClass.java
C:\java_stuffs> java -cp . MyClass

But there's no reason why after setting the classpath/path, it still don't work. In some instances, I set either one, it works. So it's just weird. Anyway, below is what I did:

1. Open up 'Control Panel'
2. Double click on 'Systems'
3. Select the 'Advanced' tab
4. Click on 'Environment Variables'
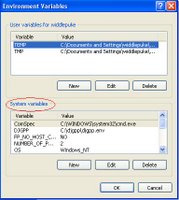
5. Look for 'PATH' under 'System Variables' as can be seen in the image below.


6. Edit the 'PATH' variable but don't delete whatever that may be inside!
7. Move your mouse cursor all the way to the end of the text that you see in 'PATH' and paste your java path at the end. It should look something like this: ';C:\j2sdk1.4.2_07\bin'

There have been occasions where I needed to add a '.' to my PATH, something like this: '.;C:\j2sdk1.4.2_07\bin'
And yet there are times when I have to do the above steps but instead of using the PATH variable, I use the CLASSPATH. (Sometimes I have to create it as it is missing.)

Sunday, May 14, 2006

Setting up of svn

This is a post from another blog, did this some time ago.. but perhaps I should do some proper documentation..

Well over here at my instituition, the open source group here managed to get a nice server for ourselves, and lucky me got an account. Someone of course set up the server and stuff. It was set up using Centos, which is essentially RedHat. xen was set up inside, so we essentially had 3 virtual machines inside one! How cool is that?

Anyway so I had one of those virtual machines to mess around with. Of course I was suppose to do some serious work on it. I was supposed to set up a repository, namely subversion. So I set up 2 repositories for the security group to make use of for their projects. To check in and check out, there are a few ways. The painful way is to remotely ssh to the server, which I don't think they want to go into that. Hence, the easy way is to use tortoisesvn. But of course they will still have to rtfm. Tortoisesvn is really nice visually and quite easy to use.

To browse the repository, I've actually set up Trac which is a pretty nice project management tool. Initially was confused with the setup and it was quite a pain to setup because of the many dependencies it had on other modules. But once done, it runs pretty smoothly and quite easy to manage using the trac-admin tool.

So of course, the access and authorisation rights have to be set somewhere, and most of it was done in the httpd.conf file of apache. Further fine grained access rights was set with the svn.

Friday, May 05, 2006

http://opensource.mit.edu/

Tuesday, March 21, 2006

Was introduced to Konfabulator by a Andrew and well, was trying to use it as an interface for this extracting thing I am trying to do. Yes, the db is a pain to use, and its difficult to track students this way. But well, it is access and it is.... :p

Anyway, so as I am dabbling with perl, I used it together with some Win32::OLE and Win32::ODBC packages, by Roth consulting I believe. Pretty cool for them to come up with these although there's something else called DBI, but I am not too sure how to use it, so nvm, this is supposed to be quick and dirty anyway.

So how its suppose to work is like this. Double click on the konfabulator widget, it executes a shell command(cool feature man) and runs perl, which extracts the stuff from the access db, and dumps it in an excel, so that the user can easily see the data. Of course, this is for windows users only.