Saturday, December 13, 2014

The new Android Studio and intel HAXM

Hola! It's been a long time since I have blogged anything. Well, let's not make any promises, I actually just wanted to document some stuff I was doing, so might as well do it here and try to stop being a lazy ass.

The new Android Studio is really cool, and I decided to try it out since I have not touched ADT eclipse for a long time anyways. But right now, http://developer.android.com/ looks like this: 


That is so not cool Google. It's bad!! So that's why I am here actually, wasting time, waiting for the page to come back alive so I can continue with their tutorials. Trying to learn something shouldn't be this hard! Trying to get in on the #HourOfCode and sh*t. heh heh.


So I had previously used the old Android Studio, and it kept saying it couldn't find the SDK, so I was pretty miffed and left it for a while. Then I tried redownloading the Android Studio again, and pow wow, there was a new snazzy Android Studio. 


I like it, I do, but the emulator was super duper slow.. :( So after some googling, found out about the Intel HAXM thingy to help make it faster. 


Or you could use the SDK Manager to install it, but apparently it LIES! It will say that it is apparently installed:

But it really isn't, it's just downloaded, so you would have to search high and low for it. So don't bother, just download from the link above. Once you have downloaded it, double-click to install and if you hit a popup that says something about virtualization, then you would have to enable it in your BIOS.

So restart your computer(annoying - I know.) and get into the BIOS and look for "Virtualization Technology", and enable it. Then once you are back in Windows, then try installing the HAXM again. 

After installing that, I found I had to restart Android studio as well, and even then, it was a bit better, but still had issues. I restarted the virtual device several times, but it seemed to be getting worse. 

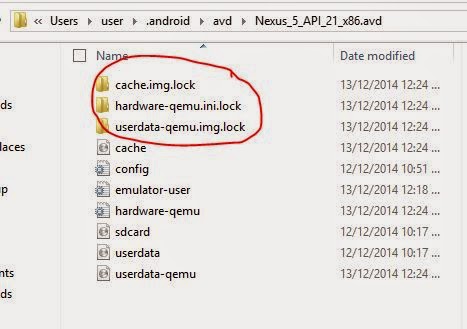
I found that apparently my device did not stop properly, and so I had to clear the locks on it. To do that, I removed all .lock files:


Another thing that helped, was to wipe the user data before I ran the virtual device:


As you can see, it says that the size on disk is 1 gigantous GB! When I started, it was only about 700 MB. So clean your disks people, it helps. After that, it was much smoother. Of course I haven't tested enough, but hopefully it stays this way. Subsequent deployment of apps was pretty fast.

Ahh, the page is back alive!

Friday, October 26, 2012

Joomla and Akeeba

So there I am, having installed joomla (both versions 2.5 and 3), and trying to get Akeeba Subscriptions to work. It is an awesome product, I don't mean it's not, just that somehow I couldn't get it to work, my users were not being added to the subscribed groups. I read and re-read the documentation several times, and followed the instructions, but still it's not working, until now, when I changed one of the configurations on access levels.

It was really frustrating, and I didn't want to email Akeeba over this as it seemed like IT WORKED FOR EVERYONE. So I thought it must be something I was doing wrong! And it was, but thought it would have been good if there was a more detailed documentation. Maybe it's just me or the new generation syndrome, everything needs to be spelt out hurhur. Anyway, for all the rest of the lazy bums like me, if you are having a similar problem with the user groups ACL in joomla for Akeeba, here's a visual mini tutorial.It is similar to what is described in the documentation given in the Akeeba documentation, but with a little of my addons.

This article assumes you are fairly familiar with Joomla.

1. Under User Manager: User Groups, create a user group called Subscribers

2. Click on Viewing Access Levels and click New to create a new viewing access level.
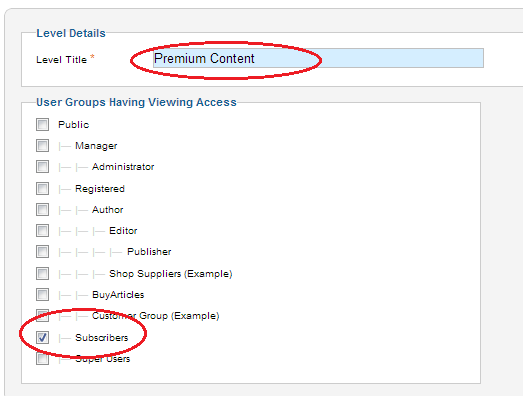
      a. Fill in the level title as Premium Content
      b. Select the user group that you have previously created, Subscribers.
      c. Click Save and close


3. Once you have done the above, you can go ahead to set your selected content to the the View Access Level Premium Content. An example is shown below:

4. Now we will move on to creating the subscription levels in Akeeba. Go to the Akeeba component and select Setup>Subscription Levels. Click New. To keep it simple, I will just be creating a free subscription.


5. Now comes the part that I had been tearing my hair over. As you can see later, it was really a very minor thing I missed out on. Note the circled part, leave it as PUBLIC. I went on and changed it to something else and hence it didn't work. Go to Extensions > Plugin Manager, click on the Akeeba Subscriptions - Joomla! Usergroups Integration. 

6. Add a subscription link to your menu. You can choose to select multiple types of subscriptions

And that's it! Now you can try to login as a user and test your subscription to see if it works. 
Hope this helps someone out there, and thanks to Akeeba for creating an awesome product!


Tuesday, July 19, 2011

Working with JavaScript frameworks

Currently working on extjs4 for a project at work. I have to admit that though extjs4 is pretty, the documentation really drives me nuts. I had contemplated dropping down to extjs3 as the tutorials seem to be more common, but in terms of the pretty factor, extjs3 can't compare. Also, the code required to do something similar in extjs 3 vs extjs4 is quite different in some cases. As in less lines of code. I love that sort of thing.


I guess I will try to document the problems I face here, and perhaps later will write a mini tutorial(maybe contribute to the examples in sencha?) We'll see.


Some quirks here:


- When passing my data as json, I had to remove the quotes from the data that I meant as numbers, in particular for my case, float. And how I did that was to force the type in my php code before I spat out the data. Not sure why that behaviour, but this caused me a lot of trouble in my chart. I just couldn't get the points to map correctly until I did that.


-  When using the type 'Time' for my chart, I have to define my fields in the model as
fields: [{name: 'date', type: 'Date'}, {name: 'close',type:'float'}]
vs just 
fields: ['date', 'close']  (This worked for my other models.)


So the above is what I can remember offhand, Will add to it when I have time again.

Friday, June 10, 2011

Another of my nonsense drawing... 
Well I know in my last post I said that I would write more about my development with Android... I did do up a couple of apps, but well, documentation, have not really gotten down to it :p

Anyways, I'd just like to really say wow about Audacity. I know its been around for a long time, but have not really used it... till lately when I needed it for a small project. It's just way cool and really kudos to those who have contributed to that project. I'm not an expert in sound, but the folks at Audacity have made it so easy to use. Do try it out if you need some kind of a sound editor. http://audacity.sourceforge.net/

I've also been using this other software called MediaCoder ( http://www.mediacoderhq.com/ ). Been using it to convert formats and also to extract the sound from videos. Pretty cool.

Tuesday, April 26, 2011

So I've gotten my hands dirty on the android phone, and think I might be writing a little tutorial on it. I used phonegap, jquerymobile, html5, and eclipse as the IDE. Also been messing around with Mr Android drawings :D well till later when I have the time to write the tutorial!

Thursday, March 25, 2010

Introducing my little giraffe... inkscaped!


Been playing around with inkscape as mentioned earlier, and I quite like this tutorial as it was pretty simple.


So after the tutorial, I followed it as closely as I could (although I did use some different techniques), and this is the result..


Well I improvised a bit for the eyes lol

And here is my first little inkscaped version of my little soft toy giraffe. Her name is 'YoYoYo'. Yes, that's not a joke. :)


There's still room for improvement of course, and it took me too damn long to do it too :p And I know, it's a giraffe, but hey why is the neck so short, and what happened to the leggys??? Well, my soft toy really looks like that... take it as an alien giraffe? Hopefully I will continue to have inspiration!


Friday, March 19, 2010

swirly whirly

I made some swirlies using inkscape, and there you have it, a header for my blog. Been a long time since I used Inkscape properly, and that's my first proper attempt with the swirlies :D

Tuesday, March 09, 2010

Red Hat with Virtual Box

Well it's been a long time since I've updated this blog. Truth be told, I kinda forgot about it till we went through some stuff that I did long time ago in this Red Hat course that I am attending currently. I'm a lazy bugger :p

So anyway, been reviewing lotsa stuff that I've kind of forgotten, and learning new things, so it's all good. Currently I am using Red Hat on Virtual box as practice at home since I don't have a Linux machine at home.
Red Hat's pretty cool, but I think I still like Fedora simply for the fact that it's not commercial. But anyway, since I am going to take the exam for RHCT, then I have to be familiar with red hat. I know I should've taken RHCE, but well I was kinda volunteered into this whole thing. I just don't like exams you know. I like to play around with stuff, but exams... oh well, wish me luck :)

Thursday, August 28, 2008

Web services

For the purpose of my work, I also have to look into web services. I have to admit, that while I've looked at quite a couple of technologies, I have not actually set up a web service before. I will attempt to, but first I gotta learn more about it. So here's some definitions taken from all over.

As taken from the W3C Working Group
[Definition: A Web service is a software system designed to support interoperable machine-to-machine interaction over a network. It has an interface described in a machine-processable format (specifically WSDL). Other systems interact with the Web service in a manner prescribed by its description using SOAP messages, typically conveyed using HTTP with an XML serialization in conjunction with other Web-related standards.]


As taken from wikipedia

The W3C Web service definition encompasses many different systems, but in common usage the term refers to clients and servers that communicate using XML messages that follow the SOAP standard. In such systems, there is often machine-readable description of the operations offered by the service written in the Web Services Description Language (WSDL). The latter is not a requirement of a SOAP endpoint, but it is a prerequisite for automated client-side code generation in many Java and .NET SOAP frameworks (frameworks such as Spring, Apache Axis2 and Apache CXF being notable exceptions). Some industry organizations, such as the WS-I, mandate both SOAP and WSDL in their definition of a Web service.

More recently, RESTful Web services have been regaining popularity. These also meet the W3C definition, and are often better integrated with HTTP than SOAP-based services. They do not require XML messages or WSDL service-API definitions.


Wednesday, August 20, 2008

Google maps

ahh, finally, I am made to work with google maps. Should be interesting, just that with other stuffs going on, never found the time. So here I shall start my little own documentation on how I'm progressing with the google map app thingy.

http://code.google.com/apis/maps/

Thursday, May 22, 2008

PIL

Some of my students had problems installing PIL with python on their windows XP. Something about python being compiled by a VS compiler. Anyway, managed to resolve the issue by downgrading to python 2.4 and using PIL 2.4 as well.

Wednesday, April 09, 2008

Useless?

Just found this website while looking around resources for python. It's pretty funny, and kind of useful in my opinion! Check it out useless python

Python

ahh so I've gotten lazy in updating this blog, but nvm I can start again!

Regarding Django, I've found it relatively easy to use. And of course, once one gets the hang of it, it is easier, but when you are just starting to learn it, the learning curve can take a while. Perhaps it is because I was also not familiar with python then.

For work reasons, I have to be familiar with python now, so anyway I helped a friend out to parse some stuff out from the web. Had intended to use perl as I really like perl's regex, but thought I might as well try python to finally know how to use it :p Anyway, I found this neat little tool pyparsing and also learnt more about python's regex.

I still prefer perl's regex..... or maybe cos I've been using it for so long so I'm biased. But anyway nvm, I need to learn to like python... for a few months at least hahaha

Tuesday, October 16, 2007

Catalyst

I've been trying out Django, so I was thinking, I wanted to try out the webframework for perl too, so I poked around and found Catalyst. Still in the midst of testing it.. and so far... it still seems a little unfrenly.......... but we'll see, I will update about it again.

Friday, October 05, 2007

Bulk resize with python

Recently I had to pick up python for a project. So as usual, it is easier and more fun for me to learn something if there is a purpose! So this time, since I'd been messing around with a new camera, I wanted to have something to bulk resize my pics. So I decided to write a script for it. And so here it is!
import Image, os

def make_smaller(path):
for item in os.listdir(path):
try:
image = Image.open(item)
image.thumbnail((583,389), Image.ANTIALIAS)
print 'Resizing: '+item
image.save('small/'+item)
except IOError: None

make_smaller('/home/widdlepuke/Desktop/Python module installers/test')

Very simple, and I must say, I do kinda like python now. I still like my perl though :p I am also currently messing with the Django framework. More on that next time.

Wednesday, September 19, 2007

Attempt to install modperl

Recently I attempted to install mod_perl on my FC5 at home. Unfortunately, it ended up with my internet connection screwing up. Ndiswrapper got messed up and I was in a funk, so I delayed a time before getting down to work on it. So I reinstalled ndiswrapper, thinking it might have been corrupted, but I ended up with my fedora giving me panic attacks!!!

It was quite a pain, and of cos seeing those panic warnings made me panic a little too! Then I tried recompiling it and so on and stuff, still failed. In the end, I took a closer look at my error messages, and realised that there was a conflict with my kernel info in grub. I didn't take down the error messages, but it was something about the kernel not being suitable for wireless settings. (I was on a wireless connection) So I checked, and to my surprise, my grub looked.. grubby. It wasn't what I had put in earlier.. and there's a blog entry here to prove it since I did record down how I setup my wireless connection in this blog. So I suppose something I did when I tried to install modperl screwed it up, and I ended up loading a different kernel from what I expected. So I just changed it back to the original and then my ndiswrapper was happy!

So it was alright then, in about 2 hours or so. I haven't got my modperl working though, kinda busy to work on it, but I'll try to do it, and will update here in time :p

Wednesday, August 29, 2007

Subversion

I recently set up a subversion server for my institution. I had set one up a long time ago, but this is a different server. So had to revisit some stuff. So I guess I should document some of the stuff in case I forget them again.

So first of all, I have to create the repository. In my case, I put it in /svn/repository and I create my repository there.

# svnadmin create bankapps initenv


Settings for SUBVERSION in httpd.conf

1: <Location /svn/bankapp > -->the parameters you put in your url
2: DAV svn
3: SVNPath /svn/repository/bankapp -->the actual path to your repository
4: AuthzSVNAccessFile /svn/users/users -->the path to your user access list
5: Require valid-user
6: AuthType Basic
7: AuthName "Bank Applications Development"
8: AuthUserFile /etc/svn-auth-file -->the path to your password file
9:
</Location >


Lines 2 and 3 are the required lines for this to work, you may omit the rest if you want to allow public access.

In the user access list, you have to create a file, and in the file, it should look something like this:

[bankapps:/]

maggie = rw
user1 = rw

[/]
maggie = rw

And, for your password file, you also need to create it, using htpasswd:
# htpasswd -c passfile user

You will then be prompted to create a password. Subsequently, you may add more users:
# htpasswd -b passfile user password

Then you have to restart your apache
# ./httpd -k restart

Now, browsing to http://yourdomain.com/svn/bankapp should prompt you a password and allow you to browse the files inside.

To upload and do stuff, get the tortoisesvn, it's rather userfriendly! http://tortoisesvn.tigris.org/


Tuesday, September 12, 2006

FC5 and jre

Was trying to get my java runtime environment working in FC5, thanks to this excellent guide, I managed to get it up really fast. http://www.mjmwired.net/resources/mjm-fedora-fc5.html#java

They have more resources than just on jre, so take a look at it. But in case they remove it anytime in the near future, I am pasting the guide to setting up jre:

1 March 2006

NOTE: Fedora Core 5 advises AGAINST using the Sun Java RPM.
Information can be found in the FC5 Release Notes on Java since the RPM may be
overwritten by a 'yum update' due to similar package names.

However if you do NOT use the FC5 Java packages, this should not affect you.

URL: http://java.sun.com/j2se/1.5.0/download.jsp

Choose the LATEST JRE Update, currently 6:

JRE 5.0 Update 6 includes the JVM technology
The J2SE Runtime Environment (JRE) allows end-users
to run Java applications. More info...
Download JRE 5.0 Update 6

Make sure to (*) Accept License Agreement

Choose:

Linux Platform
Linux self-extracting file (jre-1_5_0_06-linux-i586.bin, 15.99 MB)

Run:
[root@charon fc5]# sh ./jre-1_5_0_06-linux-i586.bin
(type 'yes')
[root@charon fc5]# mv -f jre1.5* /opt/jre1.5
[root@charon fc5]# ln -s /opt/jre1.5/plugin/i386/ns7/libjavaplugin_oji.so /usr/lib/mozilla/plugins/libjavaplugin_oji.so


(If you update the JRE package, simply delete the /opt/jre1.5 directory and
copy the update to /opt/jre1.5 -- there will be no need to update the 'ln' link.)

---

Controlling Java through 'alternatives'. When running the 'java' command,
FC5 will automatically pick the GNU Java, to use Sun's java do the following:

[root@charon fc5]# /usr/sbin/alternatives --install /usr/bin/java java /opt/jre1.5/bin/java 2
[root@charon fc5]# echo 2 | alternatives --config java

[root@charon fc5]# java -version
java version "1.5.0_06"
Java(TM) 2 Runtime Environment, Standard Edition (build 1.5.0_06-b05)
Java HotSpot(TM) Client VM (build 1.5.0_06-b05, mixed mode, sharing)

NOTE for SELinux User

Users running SELinux may NOT be able to get their browser to detect
the plugins. Make the following changes to the SELinux policy:

Run: system-config-securitylevel
Goto: SELinux > Modify SELinux Policy > Compatibility >
Allow the use of shared libraries with Text Relocation
Allow executables to run with executable stack

Sunday, September 03, 2006

FC 5 - Fedora Core wireless network setup with a windows driver

alright, I finally changed my windows to an FC5. And therein lies the problem, my stupid wireless driver is only for windows. Nevermind that, there are solutions right? And yup, I found ndiswrapper. Seriously, bless the fella who created that tool as it must have saved many a wireless network card. Anyway, so I proceeded to install it, but there were lots of tweaking to do. So this is what I have done, hopefully it helps some other poor soul.

1. Login as root, and type this command
# su -
(Frankly speaking, I don't know why I had to do this, but if I didn't, ifconfig and such commands won't work.)

2. Ensure that you have the kernel-devel RPM suitable for your kernel. You can check this by using this command
# cd /usr/src/kernels (If you do not have any, most likely you wouldn't even have the kernels folder.)

Assuming that you do not have it installed..(if you do, skip to...step 8)
3. Check your kernel version
# uname -rm

4. Proceed to look for the correct kernel-devel RPM
Note: The default stack size in the original FC5 kernel is only 4K, but most other external drivers like in my case, the wireless drivers, they require more, so you should update your original kernel as well.
Try this website
(http://www.linuxant.com/drivers/hsf/full/downloads-fc5-kernel-i686.php?PHPSESSID=b1775eea161ff873e65c90702b698052)

5. When you have downloaded the correct RPMS, you can create a folder to hold them and cd into it
# rpm -ivh *.rpm

6. Once installed, you have to edit grub to let it know which kernel to boot up as the original kernel is still there.
# cd /boot/grub/
# vi grub.conf
.....
title Fedora Core (2.6.15-1.2054_FC5.stk16smp)
root (hd0,0)
kernel /vmlinuz-2.6.15-1.2054_FC5.stk16smp ro root=/dev/VolGroup00/LogVol00 rhgb quiet
initrd /initrd-2.6.15-1.2054_FC5.stk16smp.img
#title Fedora Core (2.6.16-1.2129_FC5)
# root (hd0,0)
# kernel /vmlinuz-2.6.16-1.2129_FC5 ro root=/dev/VolGroup00/LogVol00 rhgb quiet

As you can see, I've commented out the original grub configs, so that grub will ignore them and boot the correct kernel.

7. Now reboot your system, once it starts, open your terminal window and repeat step 1. Then type this to check that the correct kernel is loaded:
# uname -rm

8. Get your Windows wireless network card drivers.

9. Install unshield(http://synce.sourceforge.net/synce/unshield.php)
# ./configure
# make
# make install

10. cd to where you downloaded the windows driver and use unshield to extract your cab files from your driver
#mkdir tmp
# unshield -d tmp x data1.cab

11. Ensure that you have no previous installations of ndiswrapper
# make uninstall
# make distclean

12. Download and install the latest ndiswrapper
# make
# make install

13. cd to the tmp folder we created earlier in the windows driver directory and look for an INF file.
# ndiswrapper -i .inf
# ndiswrapper -l (To check if the driver is there)

14. Edit the modprobe.conf file
# vi /etc/modprobe.conf
Add "alias wlan0 ndiswrapper" to the top of the file and make sure there is an extra line at the bottom of the file. Save and close.

15. Load the ndiswrapper.
# modprobe ndiswrapper

16. To check if ndiswrapper has been loaded, do this:
# dmesg

17. Now, to configure your network card. Go to System > Administration > Network

18. Click New and select wireless as your device type.

19. After clicking "Forward", you should see ndiswrapper as one of the wireless card to configure. Select it and the rest of the configurations will depend on your own wireless network.